9 minutes reading time
X-plane is a flight simulator available for Windows, Linux and macOS. One of the nice things about X-Plane is it supports community modding. You can add new aircraft, new scenery, and create plugins to modify its behavior and read its state in real time.
The SDK lets you read and write to and from X-Plane with the XPLMDataAccess API.
In this blog post I create a plugin to read flight data from X-Plane and send it in real time to MAPPS for data synchronization and analysis.
Download the X-Plane SDK from https://developer.x-plane.com/sdk/plugin-sdk-downloads/ unzip it somewhere and make a note of where you stored it at. In my case I put my copy in the G:\dev\XPlane\XPSDK303 folder. This folder contains a sub-folder called G:\dev\XPlane\XPSDK303\SDK
The hello world example says to download the Windows 8.1 SDK from Microsoft. This probably works but I already had the Windows 10 SDK installed on my system, so I used that instead.
Make sure you have the Universal CRT component installed. Up until now, my Visual Studio 2017 installation had only been used for .NET development. I did not have the Universal CRT installed. This gave me the following error when trying to compile the X-Plane examples:
> Cannot open include file 'ctype.h': no such file or directory
To add it to my system I started up "Visual Studio Installer" and pressed the "Modify" button  This brings up the "Modifying..." dialog box. Select the "Individual components" tab and search for "universal CRT"
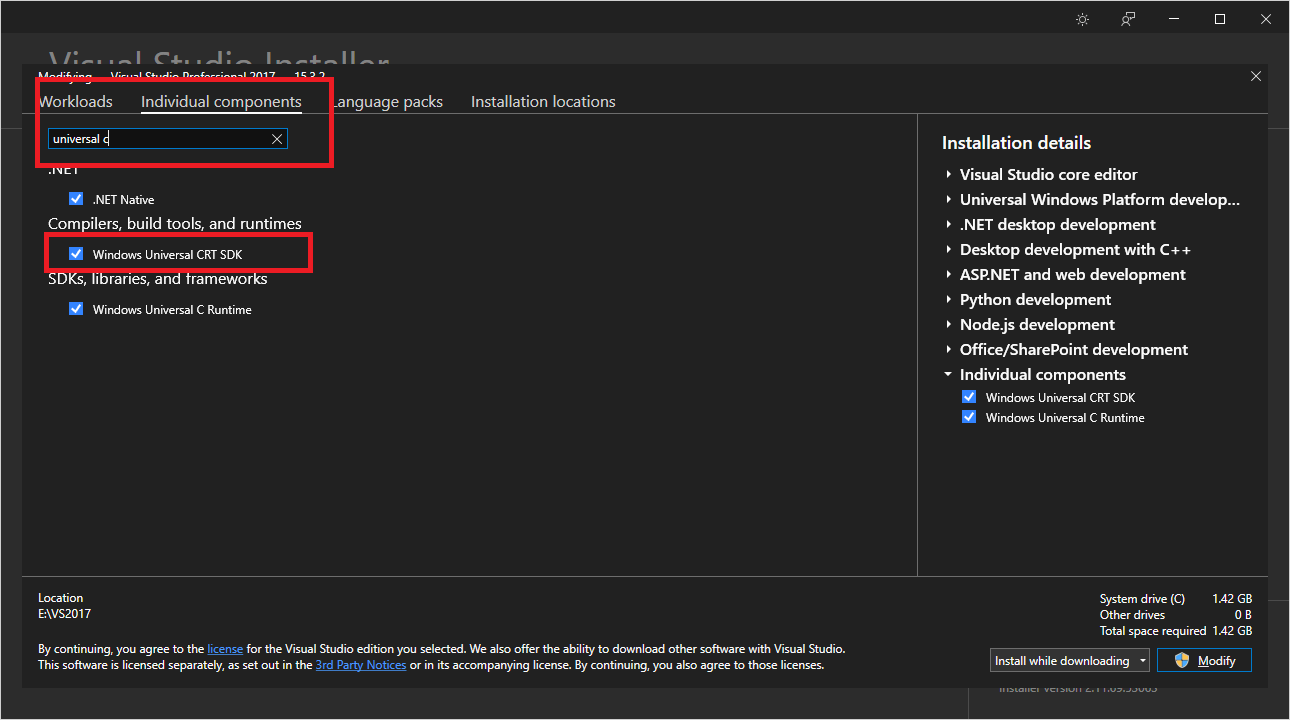 Once you see "Windows Universal CRT SDK" make sure it's checked and press the "Modify" button.
In this section I'm creating a skeleton project for X-Plane plugins. The steps taken here can be used as a starting point for X-Plane plugin development.
The hello world example says to use Visual Studio 2017. It probably works with other versions, but I have VS2017 installed. I have not tried this with VS2019 or VS2022 yet.
The first thing to do is to create a new Visual studio solution. Open Visual Studio and use the File > New > Project... menu to create an Empty Visual C++ project.
 I set the name to "MyPlugin" and pressed "OK"
X-Plane plugins are DLLs and your project need to know where to find the SDK and its files.
First, open the Project Property Pages dialog. Right click on the project in the Solution Explorer and select "Properties" from the popup menu.
In the Property Pages dialog, select Configuration Properties > General on the left and set the following properties
Your properties should look something like this:
 Press "Apply" to accept the change.
What you're doing here is telling Visual Studio to create a DLL with the name 'win.xpl'. This is important. X-Plane looks for DLLs with the name win.xpl in its plugins folder.
You need to set a number of Preprocessor flags. Select Configuration Properties > C/C++ > Preprocessor on the left to get to the Preprocessor Definitions. Click the drop-down widget to <Edit..> the preprocessor flags. 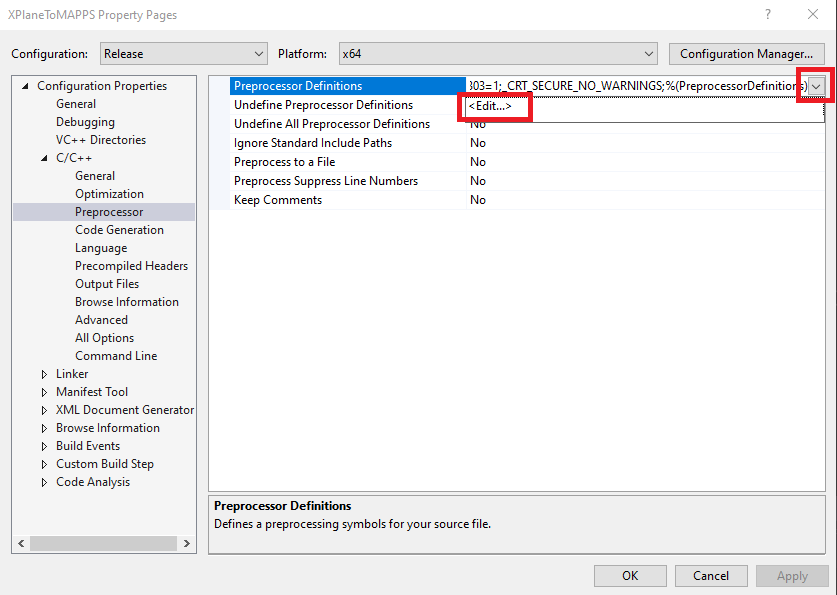 and add the following preprocessor flags to it
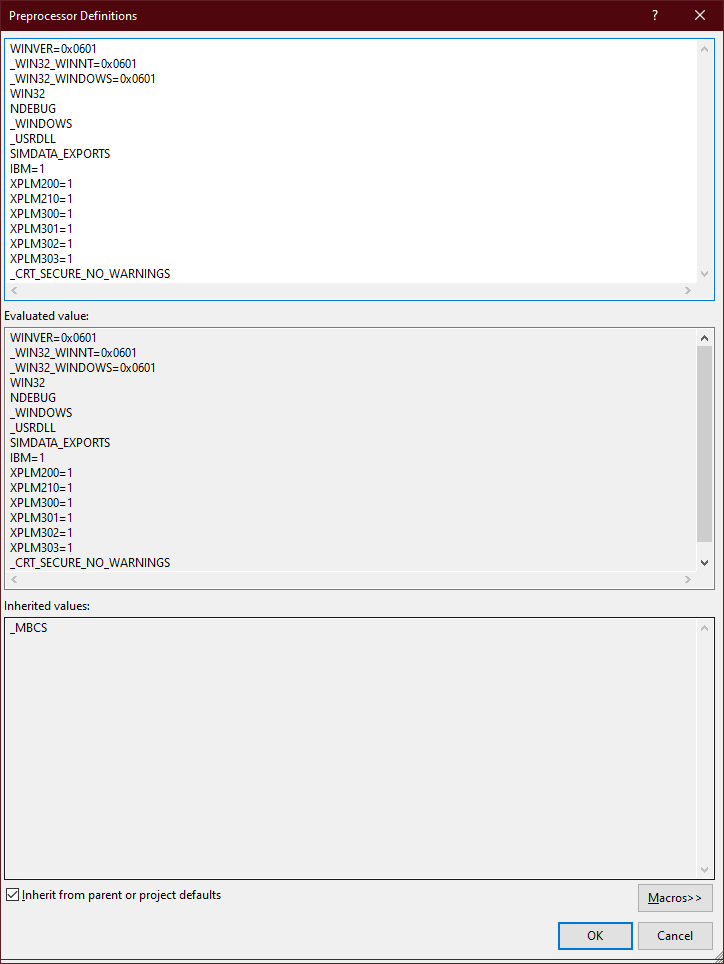
WINVER=0x0601
_WIN32_WINNT=0x0601
_WIN32_WINDOWS=0x0601
WIN32
NDEBUG
_WINDOWS
_USRDLL
SIMDATA_EXPORTS
IBM=1
XPLM200=1
XPLM210=1
XPLM300=1
XPLM301=1
XPLM302=1
XPLM303=1
_CRT_SECURE_NO_WARNINGS
 press OK to accept the changes.
In order to build the DLL, the compiler and linker need to know where to find the X-Plane SDK files.
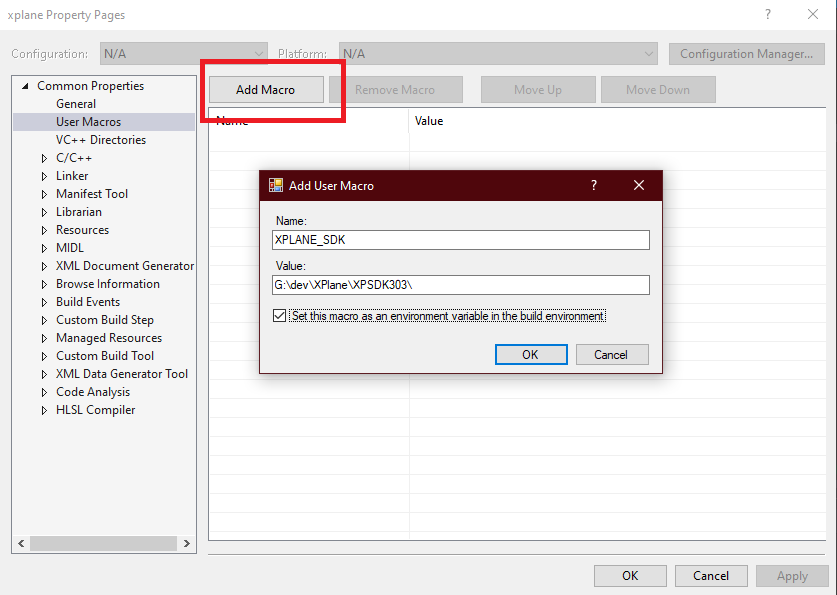
To make this project a little more flexible, I'm using a User Macro to prefix the Include and Library folders needed for compilation and linking.
Create a macro that points to the location of the X-Plane SDK on your computer.
Select Common Properties > User Macros on the left and press the "Add Macro" button. In the "Add User Macro" Dialog box set the following
 Set the include directories by selecting
 Configuration Properties > C/C++ > General on the left to get to the 'Additional Include Directories' property. Click the drop-down widget to <Edit..> and add the following paths to the list of include directories.
$(XPLANE_SDK)/SDK/CHeaders/XPLM
$(XPLANE_SDK)/SDK/CHeaders/XPWidgets
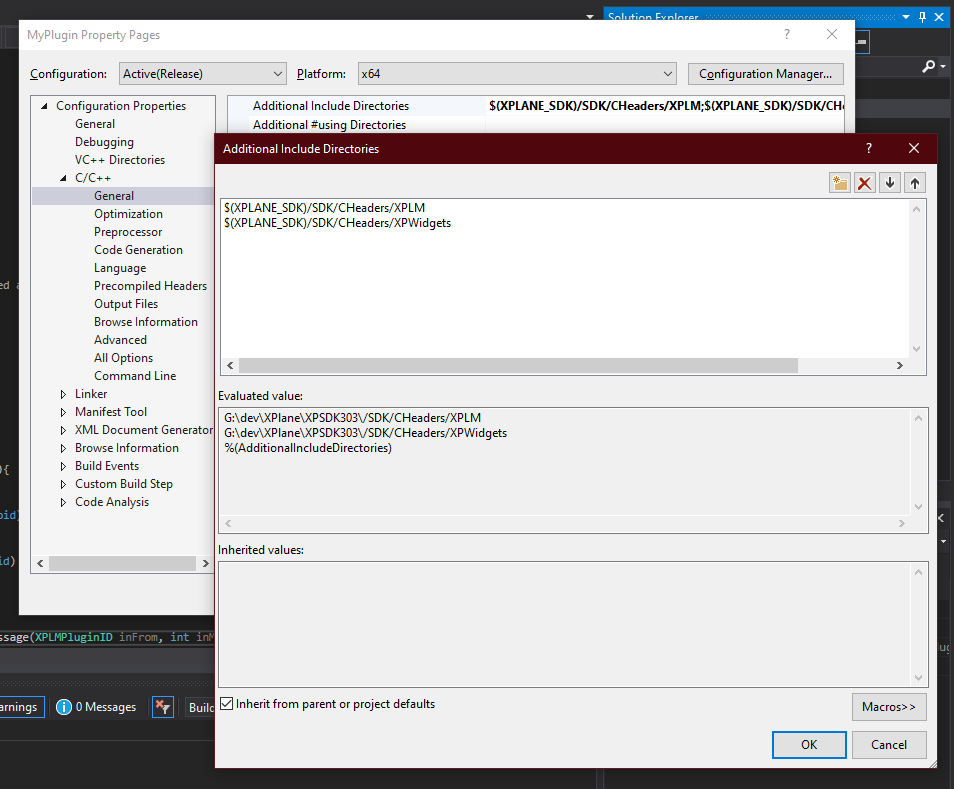 press OK to accept the changes.
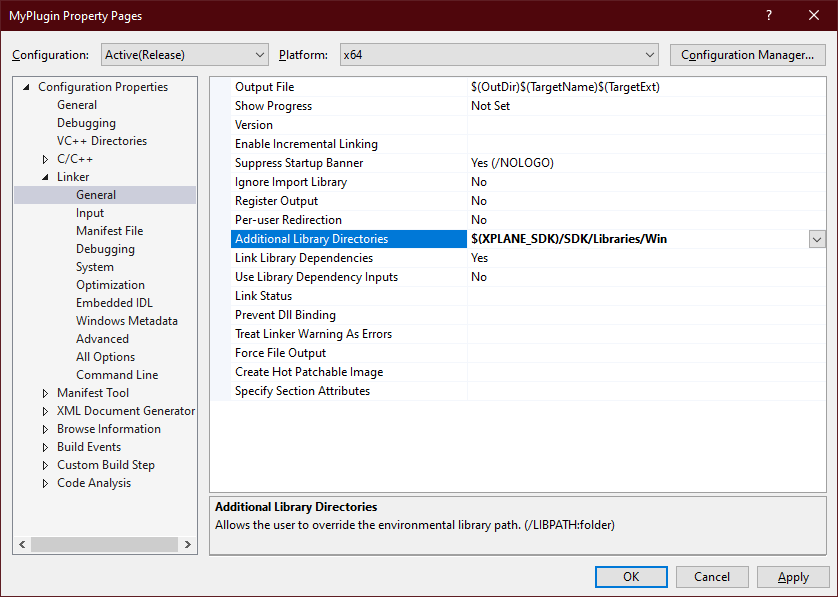
Set the library path by selecting Configuration Properties > Linker > General on the left to get to the 'Additional Library Directories' property. Add the following to it
$(XPLANE_SDK)\SDK\Libraries\Win
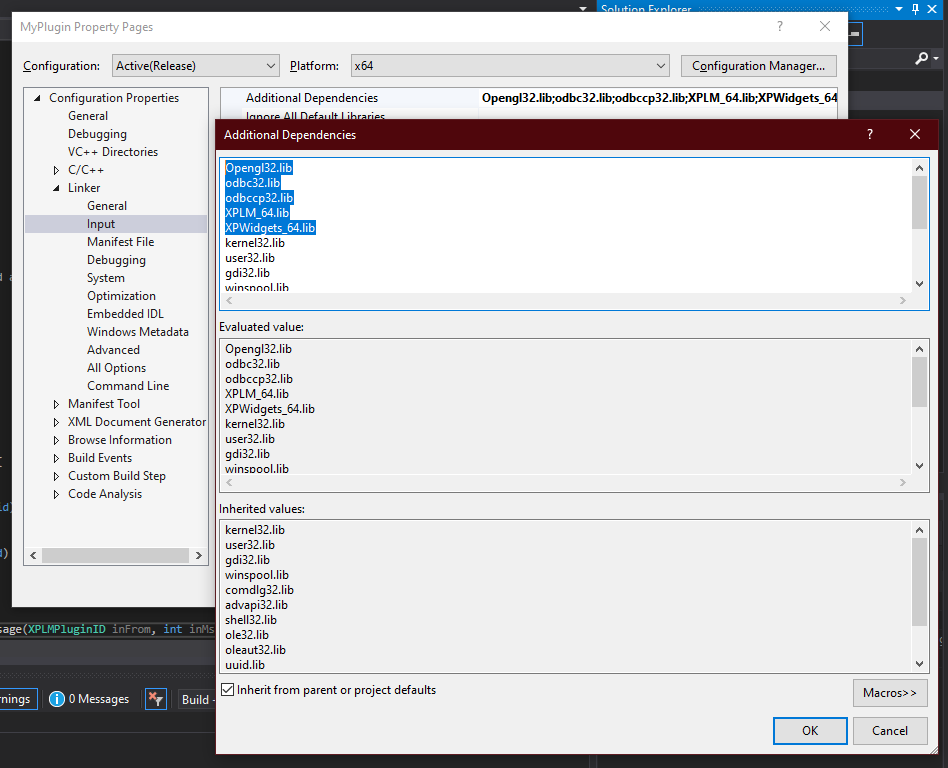
 Set the library files by selecting
 Configuration Properties > Linker > Input on the left to get to the 'Additional Dependencies' property. Click the drop-down widget to <Edit..> and add the following libraries to the list.
Opengl32.lib
odbc32.lib
odbccp32.lib
XPLM_64.lib
XPWidgets_64.lib
Add a skeleton file by right-clicking on the "Source Files" folder of your project in the Solution Explorer.
Choose Add > New Item and add C++ File.
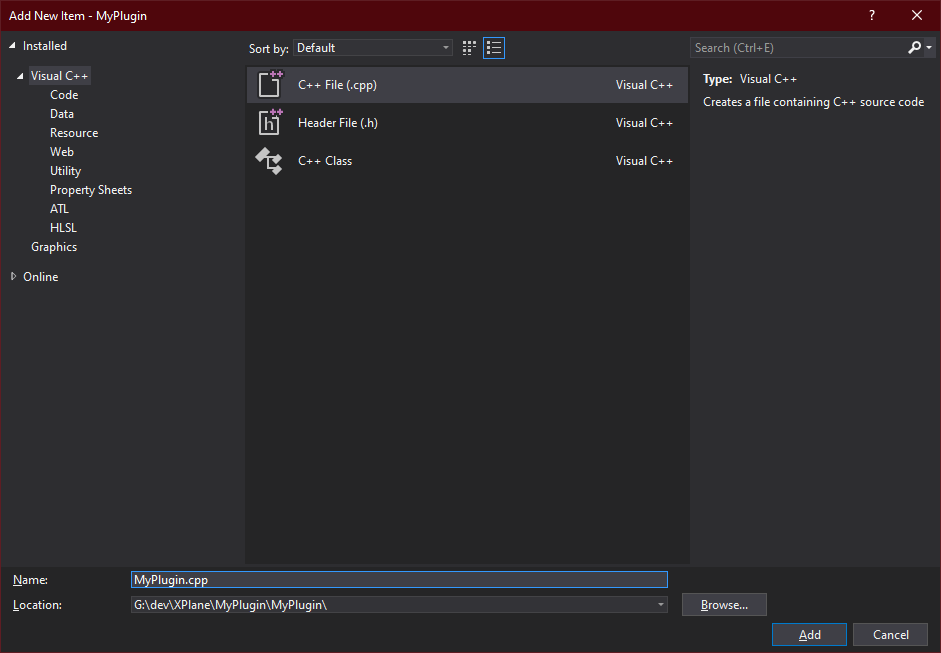 Paste the following code into your new file.
// Called when the plugin is first loaded.
// Use to allocate permanent resource and register any
// other callbacks you need
PLUGIN_API int
// called when the plugin is enabled. You don't
// need to do anything in this callback
PLUGIN_API int
// called when the plugin is disabled. You don't
// need to do anythig in this plugin
PLUGIN_API void
// called right before the plugin is unloaded. Do
// cleanup here ( unrigister callbacks, release resources,
// close files, etc )
PLUGIN_API void
// called when a plugin or X-Plane sends the pulgin a message
PLUGIN_API void
At this point you have an X-Plane plugin that doesn't really do anything.
Note that there are five functions in the above code. These are callback functions required by X-Plane. You can read more about them on the developer site here
The XPLMDataAccess API has a lot of data available. There's an extensive list of Datarefs here
I found a number of interesting properties at sim/flightmodel/position/
There are a lot more properties available. For now, I'm only interested in five of them: Latitude, Longitude, Elevation, Ground Speed and True Airspeed
In order to load the values I'm interested in, we need to add the following headers to the C++ files
And add some static XPLDataRef variables to store values
static XPLMDataRef	planeLatitude;
static XPLMDataRef	planeLongitude;
static XPLMDataRef	planeEl;
static XPLMDataRef  planeGroundspeed;
static XPLMDataRef  planeTrueAirspeed;
For now I just want to write data out to a file so add an ofstream variable at file scope
std::ofstream myfile;
In order read data from X-Plane, we define a callback function that it calls in the flight loop. Add the following function to the C++ file.
float
This function uses XPLMGetDatad() and XPLMGetDataf() to pull double and float values from the XPLMDataRef variables we created earlier. You may be wondering how X-Plane knows to set these variables. We'll get to that next.
The XPluginStart() callback is used to setup your plugin. In my case I want to setup the data reference variables and create an output file to log the values. But first, we need to set a couple of values to tell X-Plane about our plugin. Change the function to look like this
PLUGIN_API int These values get loaded into X-Plane and used to identify the plugin at runtime.
References to the data I want are obtained by calling XPLMFindDataRef() with the path of the data we're interested in:
// Find the data refs by name
planeLatitude = ;
planeLongitude = ;
planeElevation = ;
planeGroundspeed = ;
planeTrueAirspeed = ;
I also open the log file for writting with this call
myfile.;
The XPluginStart() callback is used to tear down your plugin. I unregister my callback and close the output file here
PLUGIN_API void
The complete program looks like this:
// References to flight data
std::ofstream myfile;
static XPLMDataRef planeLatitude;
static XPLMDataRef planeLongitude;
static XPLMDataRef planeElevation;
static XPLMDataRef planeGroundspeed;
static XPLMDataRef planeTrueAirspeed;
// my custom callback
static float ;
// Called when the plugin is first loaded.
// Use to allocate permanent resource and register any
// other callbacks you need
PLUGIN_API int
// called when the plugin is enabled. You don't
// need to do anything in this callback
PLUGIN_API int
// called when the plugin is disabled. You don't
// need to do anythig in this plugin
PLUGIN_API void
// called right before the plugin is unloaded. Do
// cleanup here ( unrigister callbacks, release resources,
// close files, etc )
PLUGIN_API void
// called when a plugin or X-Plane sends the pulgin a message
PLUGIN_API void
float
to try it out, build it in Release | x64 mode and copy the resulting win.xpl and win.pdb files to your X-Plane plugins folder. The exact location depends on your install. My copy of X-Plane was from Steam and is located in the steamapps/common/X-Plane 11/Resources/plugins/ folder.
You'll need to create a MyPlugin/64 subfolder and copy the win.xpl and win.pdb files there.
I've written about sending data to MAPPS in a previous article. I'm only going to write about X-Plane changes here. The complete code for the plugin and the MAPPS network adapter configuration file can be found on GitHub
I'm choosing to send data to MAPPS over UDP. I setup the socket in XPluginStart() by adding the following code:
// startup Winsock
myfile << "call WSA Startup" << std::endl;
auto result = ;
myfile << "callED WSA Startup: " << result << std::endl;
if
// Create the UDP socket
myfile << "call socket()" << std::endl;
sock = ;
if
//setup address structure
;
address.sin_family = AF_INET;
address.sin_port = ;
myfile << "call InetPton()" << std::endl;
;
myfile << "callED InetPton()" << std::endl;
MyCallback() is responsible for reading the data. The data string sent to the log file can also be sent to MAPPS through the UDP socket with sendto()
std::stringstream ss;
ss << "0," << latitude << "," << longitude << "," << elevation << "," << groundspeed << "," << trueAirspeed << "\n";
auto result = ;
When the plugin stops, we turn off networking by adding WSACleanup() to the XPluginStop() function
PLUGIN_API void